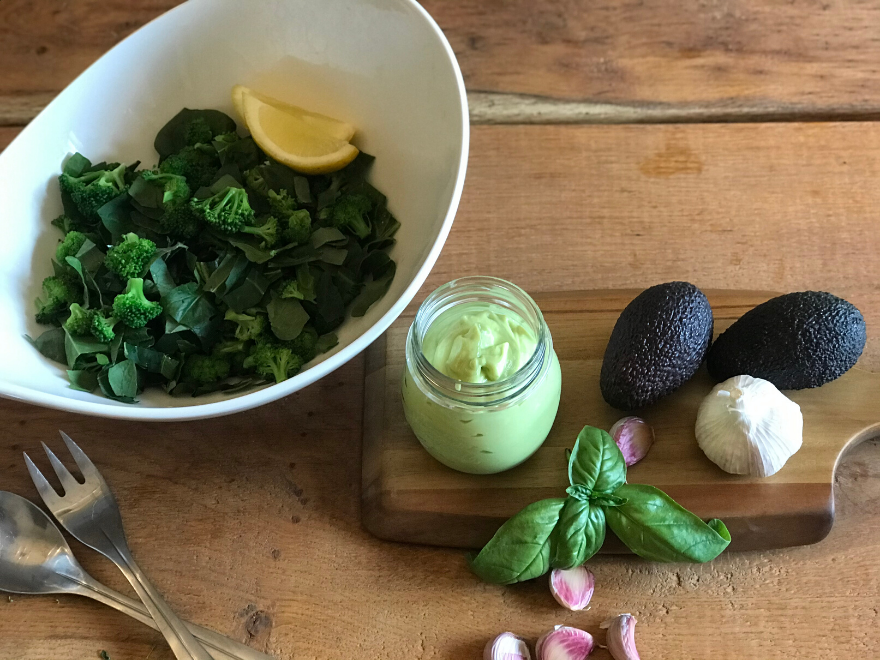
This Creamy Avocado Dressing is a really easy and delicious way to turn almost any dish into something special.
I like to drizzle it on a salad, use it as a dip or as a side condiment for my main dish. The opportunities are endless. One thing is for sure, it will make almost anything you serve with it more interesting.
INGREDIENTS:
2 Avocados
50 ml taste-neutral olive oil
A pinch of salt
A pinch of pepper
1 clove garlic
Juices from half a lemon
A small handful of herbs – I used basil
METHOD:
Boil a little water and pour it over the garlic. Leave for 5 minutes. This will take the sharpness out of it.
Add all ingredients in a blender and mix until smooth.
Anything special to remember:
You can use any herb you like. For variations, try it with parsley or mint, these also make a delicious version.
Make sure to use a taste-neutral olive oil. If you don’t you will end up with a bitter taste.
BENEFITS OF THE DISH:
Avocados are a healthy way to get good fats and they are loaded with heart-healthy monounsaturated fatty acids.
Olive oil is also a healthy way to get good fats and it contains large amounts of antioxidants, has anti-inflammatory properties and is rich in healthy monounsaturated fats.
I love salmon but for years I told myself that I didn’t know how to prepare it and only had salmon when going to a restaurant. It always ended up being overcooked or raw.
One of the secrets to a successful salmon is to get good quality salmon and prepare it on the skin side. Loads of olive oil and high heat. This way you get a crisp skin, that gives the dish a delicious crunchiness.
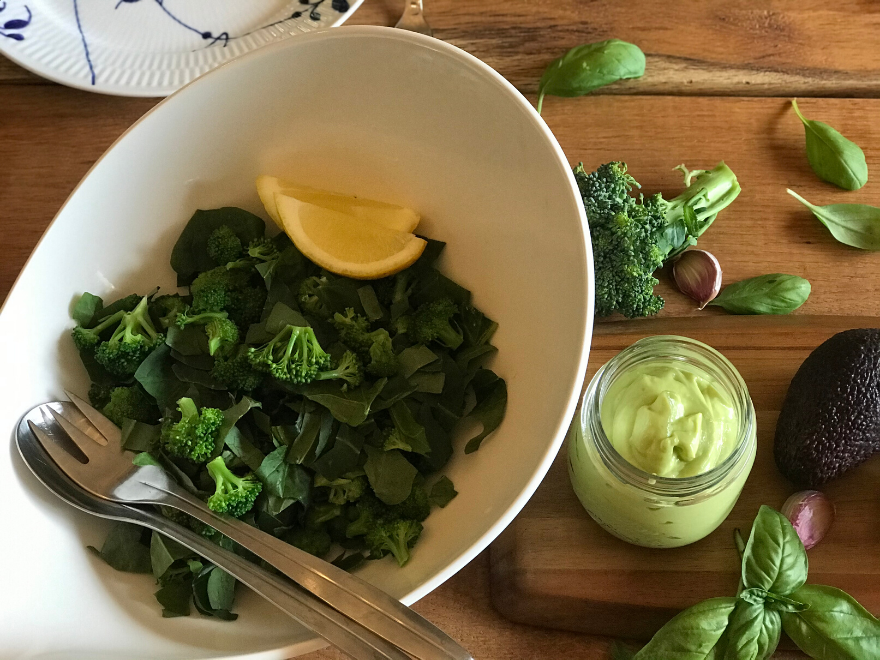
This time I accompanied the salmon with my Creamy Avocado Dressing and a simple salad with spinach and broccoli florets.
INGREDIENTS:
Serves 3-4 persons:
4 pieces of free-range salmon with skin on. Mine were approx. 120 grams each
Olive oil for cooking, approx. 50ml.
Salt and pepper to taste
Served with a simple salad with broccoli florets and Creamy Avocado Dressing
Simple Salad with broccoli florets:
200 grams of fresh spinach
1 broccoli cut in small florets
Half a lemon
Olive oil to taste
Salt and pepper to taste
HOW TO COOK IT STEP BY STEP
Heat up the olive oil in a pan and once sizzling add the salmon, skin side down.
Leave the salmon like this until done, you can check along the way by looking at the flesh. It will change colour and be done when pink all the way through.
While the salmon is cooking boil some water and cover the broccoli florets for approx. 5 minutes in boiling hot water. You want the broccoli to have crunch, that’s why we don’t cook them.
Toss the spinach and broccoli florets in a salad bowl and drizzle with lemon juice, salt and pepper.
If your salmon skin is not crunchy by now give it a little more heat for half a minute.
Salmon is a great source of omega-3 Fatty Acids, something we all need more of. Especially we need to raise the ratio between omega 3 and 6. On a traditional diet, we eat too much Omega 6 Fatty Acids which causes inflammation in our bodies.
How to increase omega 3 to omega 6 ratio:
Avoid vegetable oils high in omega-6 (and the processed foods that contain them).
Eat fish at least twice a week.
If needed, supplement with an omega-3 source like fish oil. Choose a clean product preferably wild-caught.
This Tasty Artichoke Dip makes a wonderful party starter dip with crunchy raw vegetables on the side or as a side dish for your main. The spiciness from the jalapenos combined with the creamy, cheesy taste is a match made in heaven.
INGREDIENTS:
2 cans of drained artichoke hearts, roughly cut
75ml Mayonnaise
125ml Sour Cream
80 grams grated parmesan cheese
1 chopped medium-hot jalapeno (I used a green one)
1 finely chopped spring onion
1 Tablespoon lemon juice
A pinch of salt and pepper
HOW TO COOK IT STEP BY STEP
Preheat oven to 200 degrees.
Mix all ingredients together in a bowl.
Transfer mix into a baking dish and bake for approx. 30 minutes or until light brown on top.
Serve:
Serve as a party starter snack with raw vegetables or as a side dish to your main dish. Can be served cold too but surely more interesting warm.
Ok, so let us get this straight. Once you start the Clean-Living Diet you have to say your goodbye to bread and flour in general. If bread is a major factor in your life, that transition can be difficult and because of this, I have invented different recipes you can use as a replacement for bread. Including this Morning Vegetable Bun recipe.
I seldom eat them myself – however, I bake them every week for my husband, Johan. He was not a big bread eater before he changed his diet to the Clean-Living Diet. He has not eaten bread for many years as he is gluten intolerant and as such, he simply accepted a life without, until I started to experiment baking breads without traditional flour. Instead, I use Psyllium-Husk powder, almond or coconut flour. I have found these alternatives are much kinder to the gut and do not have a negative effect unless if you have allergies to fibres or nuts. They also contain a relatively low content of carbs, which is what we are aiming for on this diet. Psyllium-Husk has 0 carbs so that is a perfect substitute for flour while working wonders in your gut.
Do not expect to get a traditional bun out of this recipe but be open-minded and see it as an alternative and a way for you to still get access to “bread”.
Not only for breakfast
I bake once a week and freeze any spares. This way Johan can have 2 buns for his breakfast each day. Occasionally I will have a bun too, however, I actually prefer to eat the same thing every morning. My morning routine is usually 2 slices of zucchini loaded with cheese or avocado, a soft-boiled egg and a bulletproof coffee. That is my “go-to”.
These are great for any time of the day. Today I had 2 of the buns for lunch. Popped them in the toaster with cheese and a piece of leftover chicken. So yummy – you see, they can be used in many different ways.
INGREDIENTS:
Depending on how much extra greens you add the colour of the buns will vary. In this version, I added green cabbage.
4 eggs
Half a big broccoli
100 grams of cottage cheese
30 grams of melted butter
50 grams of plain almond flour
30 grams of Psyllium-Husk
55 grams of sesame seeds + for some for sprinkling
1 teaspoon baking powder
1 teaspoon salt
HOW TO COOK IT STEP BY STEP
Preheat oven to 190 degrees.
Grind the broccoli and set aside in a bowl.
Blend the eggs with cottage cheese and melted butter until the lumps have disappeared. Pour it all into the bowl with the broccoli, add the rest of the ingredients and stir well.
Let the dough rest for approx. 10 minutes.
Shape the dough into buns with wet hands and place them on a baking sheet with baking paper and sprinkle them with sesame seeds.
Bake in the hot oven for 20-25 minutes until lightly golden
ANYTHING SPECIAL TO REMEMBER?
It is important to let the dough rest because the many fibres in the dough will make it firmer and easier to shape into buns.
If practising the Clean-Living Diet without diary you can change cottage cheese into mayo. Make sure to use a smaller amount. And exchange butter for olive or coconut oil.
Almond flour can be exchanged with coconut flour or Psyllium-Husk. If you use Psyllium-Husk use about 30 g.
Broccoli can be exchanged with cauliflower. sometimes I add green cabbage as well.
BENEFITS FROM THE DISH:
Psyllium: has many health benefits. It helps relieve constipation, lowers blood sugar levels, lower cholesterol levels and it has prebiotic effects.
Cauliflower: is a vegetable that is naturally high in fibre and B-vitamins. It provides antioxidants and phytonutrients.
Broccoli: Broccoli is a great source of vitamins K and C, a good source of folate (folic acid) and also provides potassium and fibre.
Vitamin K – refers to a group of fat-soluble vitamins that play a role in blood clotting, bone metabolism, and regulating blood calcium levels.
Vitamin C – builds collagen, which forms body tissue and bone, and helps cuts and wounds heal. Vitamin C is a powerful antioxidant and protects the body from damaging free radicals.
Fibre – diets high in fibre promote digestive health. A high fibre intake can also help lower cholesterol.
Potassium – a mineral and electrolyte that is essential for the function of nerves and heart contraction.
Folate – is necessary for the production and maintenance of new cells in the body.
In all honesty, Indian food has never been my favourite, for years I found it boring and missing colour. To me, food is not only about satisfying my taste buds and filling me up but also needs to satisfy my eyes. It took me a while to understand, but once I realised how a little spring onion or chili can easily change the look of a dish, voila! Easy like that.
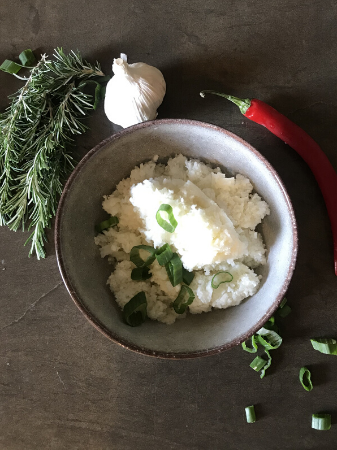
Cauliflower rice, really?
Yes, really. Since traditionally rice is high in starch and carbs, cauliflower is the perfect alternative. After a quick boil, you will get the feeling that you are having rice while you are actually stuffing yourself with vitamins like vitamin C, Vitamin K, calcium, iron and magnesium.
It is simple to make, and you are almost guaranteed, never to burn it in the pot like traditional rice tends to do.
Do you like it spicy?
Depending on how spicy you like your food you can adjust the amount of chilli and garam masala. I use a rather mild chilli since my daughter, Anna, is not into spicy food. I always put some extra chilli on the side for me and Johan.
INGREDIENTS:
Chicken breast approx. 1200 grams
1 Cauliflower
1 Chilli, diced, remove seeds (choose the colour of your liking, I used red)
1 tablespoon fresh ginger, peeled & grated
3 cloves minced garlic
1 tablespoon tomato paste
2 teaspoons of garam masala
3 tablespoons almond flour
1 tablespoon coconut oil
30 grams of butter
125 ml crushed tomatoes (without sugar and additives)
125 ml cream
1 spring onion, for garnish
Chicken Marinade
125 ml Greek yoghurt
2 tablespoons lemon juice
1 tablespoon of cumin
1 teaspoon turmeric
1 teaspoon salt
HOW TO COOK IT STEP BY STEP
Mix the yoghurt, lemon juice, turmeric, cumin and salt for the marinade in a large bowl and add the chicken pieces. Mix it all really well to ensure the chicken pieces are well coated and marinate it for at least an hour.
Blitz the cauliflower in a food processor or blender.
Boil approx. a litre of water and pour over the blitzed cauliflower. Add a little salt and place a lid on top, set aside.
In a blender add the chopped chilli, garlic, and chopped ginger and a little bit of water and blend until smooth.
Melt butter and oil and add the paste you just made along with the crushed tomatoes and stir well for five minutes.
Add the marinated chicken into the sauce and simmer, stirring occasionally, for about ten minutes.
Add the heavy cream, tomato paste, garam masala, almond flour and continue to cook for a further ten minutes (with the lid off).
Pour out the hot water from the cauliflower. Make sure to get as much water out of it as possible or it will be very wet.
Serve:
Serve hot with the cauliflower rice and garnish with chopped spring onion.
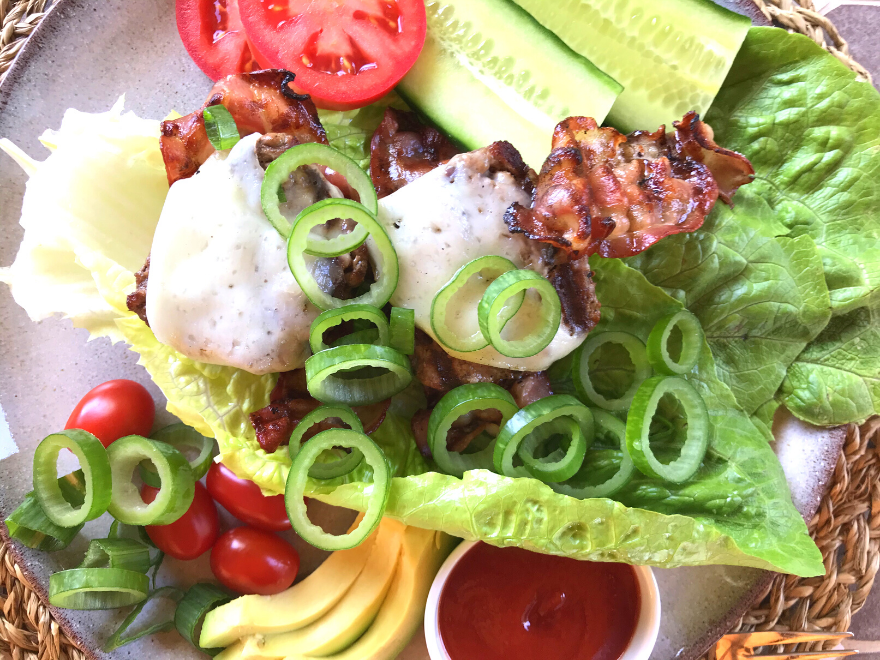
Is this even possible? Burgers when on a diet? But we are not supposed to eat bread!
Who doesn’t like burgers? We all do, right? And there is absolutely no reason to miss out on burgers when on the Clean-Living Diet. It is super easy to still satisfy your cravings for the mix of meat, barbecue, crunch, salt and ketchup. It does not have to be difficult, but you will have to think differently.
Seriously, no bun?
Yes – no bun. Bread is high in carbs and will immediately spike your blood sugar levels. But trust me, you won’t miss it. The bun will be replaced with crunchy, green, delicious salad leaves. I highly recommend you try it and if it is a total “no go” for you, you can always make a batch of my Homemade Vegetable Buns and use them as bread replacement (recipe will be posted very soon).
My 9-year-old daughter Anna has, with time, built up a taste for the crunchiness of the salad leaves as replacement of the buns. You can too.
So easy and fast
You will be surprised how easy and delicious this burger recipe is. This will be ready to be served within 20-30 minutes!
Yesterday evening, we were very pushed for time as we had been on zoom calls with clients all afternoon and we knocked this up in no time at all.
INGREDIENTS:
Serves 3-4 persons:
900 grams of organic grass feed minced veal or beef
150 grams of organic bacon
80 grams of sliced cheese (I use gruyere)
2 big romaine salad heads or 24 lettuce leaves
2 plum tomatoes cut into slices
Half a cucumber cut into slices
1 chopped spring onion
Salt to taste
Sugar free ketchup:
50g Tomato paste
50ml of water
30ml Apple cider vinegar
1 Tablespoon paprika
1 Tablespoon of garlic powder
1 Tablespoon of onion powder
A pinch of salt
A pinch of nutmeg
HOW TO COOK IT STEP BY STEP
Sugar free ketchup:
In a medium saucepan combine all ingredients. Whisk to combine.
Bring to a boil, then cover and simmer over medium low temperature for 20-25 minutes, until the ketchup thickens
Adjust the taste, by adding more salt and spices if desired.
Cool, then place in an air-tight container and refrigerate.
Burgers:
Shape the minced meat into 12 patties.
Roast on a barbecue or on a pan until done. I like mine a little pink.
2 minutes before done add a piece of the cheese on top and let melt.
Serve:
Build your burger with 2 salad leaves, a meat pattie, ketchup, tomato, cucumber and bacon.
Enjoy 🙂
ANYTHING SPECIAL TO REMEMBER?
Ketchup can be kept refrigerated for up to 10 days
Make sure to find a bacon with no additives and sugar. This is a tricky one, but it is doable. Ask at your local butcher or supermarket.
Especially sugar tends to come in many variations and is often added to bacon, sausages, cold cut meat etc.
Make sure to check the ingredient list and avoid anything you don’t know what is.
Here are some of the names that added sugars go under: Agave nectar, cane sugar, corn syrup, dextrose, fructose, fruit juice concentrate, glucose, malt syrup, sucrose, syrup and so on. The list is very long and as I mentioned before I recommend you avoid anything that you don’t know what is.